
How To Guides
- How to undertake a professional quality repair of your PVC or Hypalon RIB, inflatable boat and SIB tubes
- How to clean inflatable boats, protect RIB collars, tubes and sponsons, clean Hypalon and PVC inflatable boat fabric
- How to find a leak in my inflatable boat, RIB, dinghy, life raft or inflatable kayak collar or tubes
- How to fit a replacement screw-in type inflatable boat, rigid inflatable boat (RIB) or dinghy inflation deflation valve
- How to fix or glue inflatable boat PVC fabric patches and accessories to Hypalon fabric RIB collars and tubes (and vice versa)
- How to identify the fabric of your RIB, inflatable boat, dinghy, life raft or inflatable kayak collar, tube or sponson. Hypalon or PVC?
- How to repair inflatable boat, RIB, RHIB, SIB and kayak collars, inflation tubes or sponsons
- How to replace a Leafield Marine A4 inflation/deflation valve older inflatable boats, RIBs, RHIBs and dinghies
- How to replace an inflatable boat valve
- How to service and/or fit a replacement diaphragm to the Alfons Haar type SF1 inflation valve
- How to service or repair the Leafield Marine A7 or B7 inflatable boat valve
- How to service or repair the Leafield Marine C7 inflatable boat valve
- How to clean your RIB with August Race products
- How to winterise and store inboard engines and outboard engines
- How to make an emergency repair using TEAR-AID® Type A to a Hypalon inflatable boat, RIB, raft and other Hypalon / rubber inflatable structures
- How to make an emergency repair using TEAR-AID® Type B to a PVC inflatable boat, RIB, raft and other PVC / vinyl structures
- How to check your lifejacket
- How to install a TRIB airCap HR
- How to install a TRIB airCap LF for Leafield Marine C7 & D7 valves
- How to store your inflatable boat over winter
- How to look after and maintain the ropes on your boat
RIBs & Inflatable Boats
Safety Data Sheets
Blog
How to fit a replacement screw-in type inflatable boat, rigid inflatable boat (RIB) or dinghy inflation deflation valve
Many rigid inflatable boats (or RIBs), inflatable boats and dinghies are fitted with ‘screw-in’ type inflation deflation valves that all look very similar. They can have differing dimensions which may prevent the fitting of one part of the inflation valve (the screw-in ‘male’ section) to the other section of the valve (the ‘female’ outer section of the inflation valve body).
This guide will help you to understand the anatomy of the ‘screw-in’ type valve. Valve brand names include Halkey Roberts, Bravo, Valiant, Quicksilver etc. and are fitted to numerous brands of dinghies including Waveline, Plastimo, Seago, Wetline and many RIBs. Correctly measure the valve dimensions to ensure that you can source the correct replacement valve for your boat from https://www.ribstore.co.uk plus some guidance on how to successfully fit the screw-in/male section of your valve.
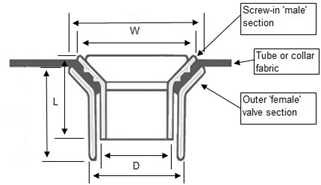
Valve anatomy and measurements:
W = Width (diameter) of the top (the part that sandwiches the tube or collar fabric) of the male and female valve sections of the valve
L = Length of the male and female sections of the valve
D = Diameter (width) of the bottom (the part that sits inside the tube or collar) of the male and female sections of the valve
A more detailed diagram of the Halkey Roberts make of ‘screw-in’ type valve (as a good example of all screw-in type valves).
How to fit a new male RIB or dinghy inflation valve section to your existing female inflatable valve section.
Once you have identified the correct male section to screw into the existing female valve section, within your RIB or inflatable dinghy tube or collar, you can get to work with the simple task of fitting the new male section of the inflation valve.
- On a flat surface, fully deflate the tube or collar before attempting to unscrew the male section of the inflation valve; have the new/replacement male section of the valve to-hand.
- Lay the deflated tube or collar flat so that you can keep downward pressure on the face of the valve. Grip the body of the female valve through the tube or collar fabric to prevent the valve moving inside the tube when you unscrew the male section of the inflation valve.
- Unscrew (counterclockwise) the male section of the valve using the correct valve spanner (or if not available, you may be able to use flat-nosed pliers inserted into the valve either side of the spring/diaphragm spindle; but care must be taken not to damage the new valve). Continuing to grip/apply pressure on the female section of the valve, remove the male section of the valve.
- Screw-in the new/replacement male section of the valve, tighten to ensure an airtight seal on the tube or collar fabric. Do not use any kind of sealant between the valve and fabric.
- Ensure the new valve spring/diaphragm spindle is in the closed position and then re-inflate the tube and test for leaks in and around the valve by spraying soapy water and observing any air bubbles forming.
Still unable to find a replacement for your existing RIB or dinghy inflation valve?
If you are unable to identify the correct valve replacement or your valve is no longer available, then it is often easier to replace the complete (male and female) section of your screw-in type valve (most make of valve can be replaced using this approach). Use a modern Leafield Marine C7 or D7 inflation valve, combined with a fabric valve aperture reinforcing patch (a 'valve doubler') in the same colour as your tube fabric. This is a fairly simple DIY job.
View & Download a PDF Version of this Guide HOW TO fit a replacement screw-in type valve