
How To Guides
- How to undertake a professional quality repair of your PVC or Hypalon RIB, inflatable boat and SIB tubes
- How to clean inflatable boats, protect RIB collars, tubes and sponsons, clean Hypalon and PVC inflatable boat fabric
- How to find a leak in my inflatable boat, RIB, dinghy, life raft or inflatable kayak collar or tubes
- How to fit a replacement screw-in type inflatable boat, rigid inflatable boat (RIB) or dinghy inflation deflation valve
- How to fix or glue inflatable boat PVC fabric patches and accessories to Hypalon fabric RIB collars and tubes (and vice versa)
- How to identify the fabric of your RIB, inflatable boat, dinghy, life raft or inflatable kayak collar, tube or sponson. Hypalon or PVC?
- How to repair inflatable boat, RIB, RHIB, SIB and kayak collars, inflation tubes or sponsons
- How to replace a Leafield Marine A4 inflation/deflation valve older inflatable boats, RIBs, RHIBs and dinghies
- How to replace an inflatable boat valve
- How to service and/or fit a replacement diaphragm to the Alfons Haar type SF1 inflation valve
- How to service or repair the Leafield Marine A7 or B7 inflatable boat valve
- How to service or repair the Leafield Marine C7 inflatable boat valve
- How to clean your RIB with August Race products
- How to winterise and store inboard engines and outboard engines
- How to make an emergency repair using TEAR-AID® Type A to a Hypalon inflatable boat, RIB, raft and other Hypalon / rubber inflatable structures
- How to make an emergency repair using TEAR-AID® Type B to a PVC inflatable boat, RIB, raft and other PVC / vinyl structures
- How to check your lifejacket
- How to install a TRIB airCap HR
- How to install a TRIB airCap LF for Leafield Marine C7 & D7 valves
- How to store your inflatable boat over winter
- How to look after and maintain the ropes on your boat
RIBs & Inflatable Boats
Safety Data Sheets
Blog
How to service or repair the Leafield Marine C7 inflatable boat valve
After a few years of faithful service, the rubber diaphragm on a RIB/Inflatable Boat Leafield Marine C7 inflation valve can fail as either the rubber material becomes brittle and fails to ‘seat’ properly within the inflation valve, or the spring or plastic diaphragm spindle can fail. Replacing the Leafield Marine C7 inflation valve diaphragm is a straightforward job and the service kits are available from ribstore.
To service your Leafield Marine C7 valve, you will need:
- The RIBstore C7 service kit, which contains a new valve spindle, spring and rubber diaphragm (1 kit per valve) see: https://www.ribstore.co.uk/products/leafield-marine-c7-inflation-valve-service-repair-kit
- C7 valve wrench spanner, see: https://www.ribstore.co.uk/products/leafield-marine-a6-c7-d7-valve-spanner
Refer to diagram below of the valve assembly to familiarise yourself with the inflation valve and its components, before you start the job.
- Deflate the collar/tube and lay the deflated tube flat so that you are able to place downward pressure on the valve body, whilst being able to grip the section of the valve that sits within the tube, through the tube fabric, to prevent it turning.
- Using the C7 wrench unscrew the outer/male section of the valve counter clockwise, ensure that the inner/female section of the valve, inside the tube, remains in place so that it is not lost within the tube once the outer section has been unscrewed.
- Retain the large black plastic sealing washer and push and turn the valve diaphragm spindle so that it is locked in the ‘open’ position. If this sealing washer is grey coloured or perished, then this should be replaced – see https://www.ribstore.co.uk/products/c7-valve-sealing-washer
- Remove the black rubber diaphragm/core seal from the end of the spindle by pulling off the end of the spindle, then return the spindle to the ‘closed’ position and remove the old spindle and spring by sliding out from the front of the valve.
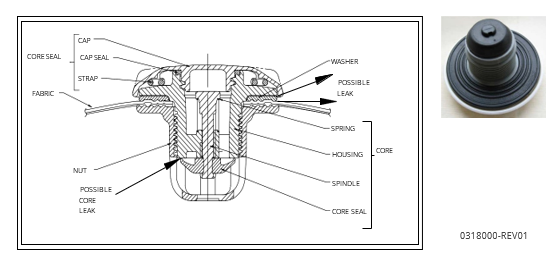
- Install the new spring and spindle and then once again lock the spindle in the ‘open’ position. Attach the new diaphragm onto the end of the spindle; ensure the rubber diaphragm is properly attached to the spindle and that the plastic flange on the end of the spindle is visible and has locked the rubber diaphragm in place.
- Unlock the spindle and test the diaphragm spring movement. Check that the rubber diaphragm seats properly onto the valve body so that air will not escape once the valve is re-installed.
- Take a firm grip of the inner/female section of the valve that sits within the tube through the tube fabric to prevent it turning, and then re-install the outer/male section into the outer/female section by turning clockwise until hand tight. Remember to re-install the black plastic sealing washer with the ridges facing the tube fabric.
- Use the C7 wrench to fully tighten the valve. Re-inflate the tube/collar and then test for leaks by spraying some soapy water around the valve and checking for any bubbles. Further tighten the valve using the C7 wrench if any leaks are apparent.

View & Download a PDF Version of this Guide HOW TO replace a C7 valve diaphragm